Quo vadis, airplane? Monitoring air traffic movements with a DVB-T stick as an ADS-B receiver on x86 (with PiAware and fr24feed)
ADS-B is an airspace surveillance system that can also be picked up by regular people. If you then upload the collected data to certain platforms, you are rewarded with functions that would otherwise cost money.
Automatic Dependent Surveillance-Broadcast, or ADS-B for short, is an unencrypted surveillance system with which aircraft continuously transmit current flight parameters. With the help of an affordable antenna that can be connected via USB to a computer or mini-computer, even laypeople can receive this flight information and upload it to certain platforms which, with many thousands of these receivers, can build precise flight routes and further statistics. In return, the people who provide this kind of data donation are rewarded with free premium accounts on these platforms. These premium or enterprise accounts are otherwise usually sold for a mid three-digit amount per year, so the path to such an account via this kind of data donation pays off in less than half a month.
This guide serves as a walkthrough for setting up and operating an ADS-B receiver on the x86 platform with a Debian-based operating system. This route is generally only worthwhile if you already have a server running 24/7 - otherwise, running a Raspberry Pi microcomputer (version 3B or higher) is significantly more efficient (and cheaper), and it can be flashed with a dedicated Image that allows for an almost effortless start into ADS-B data sharing.
In this guide, we will set up Docker PiAware and Fr24feed and connect them to each other so that we can send data to Flightradar24 and FlightAware.
Preparations
Before we can get started, a few preparations still need to be made:
1. The hardware
I use an Odroid h2+ as the hardware platform for my installation and the following steps, but all other x86-based systems should also be compatible.
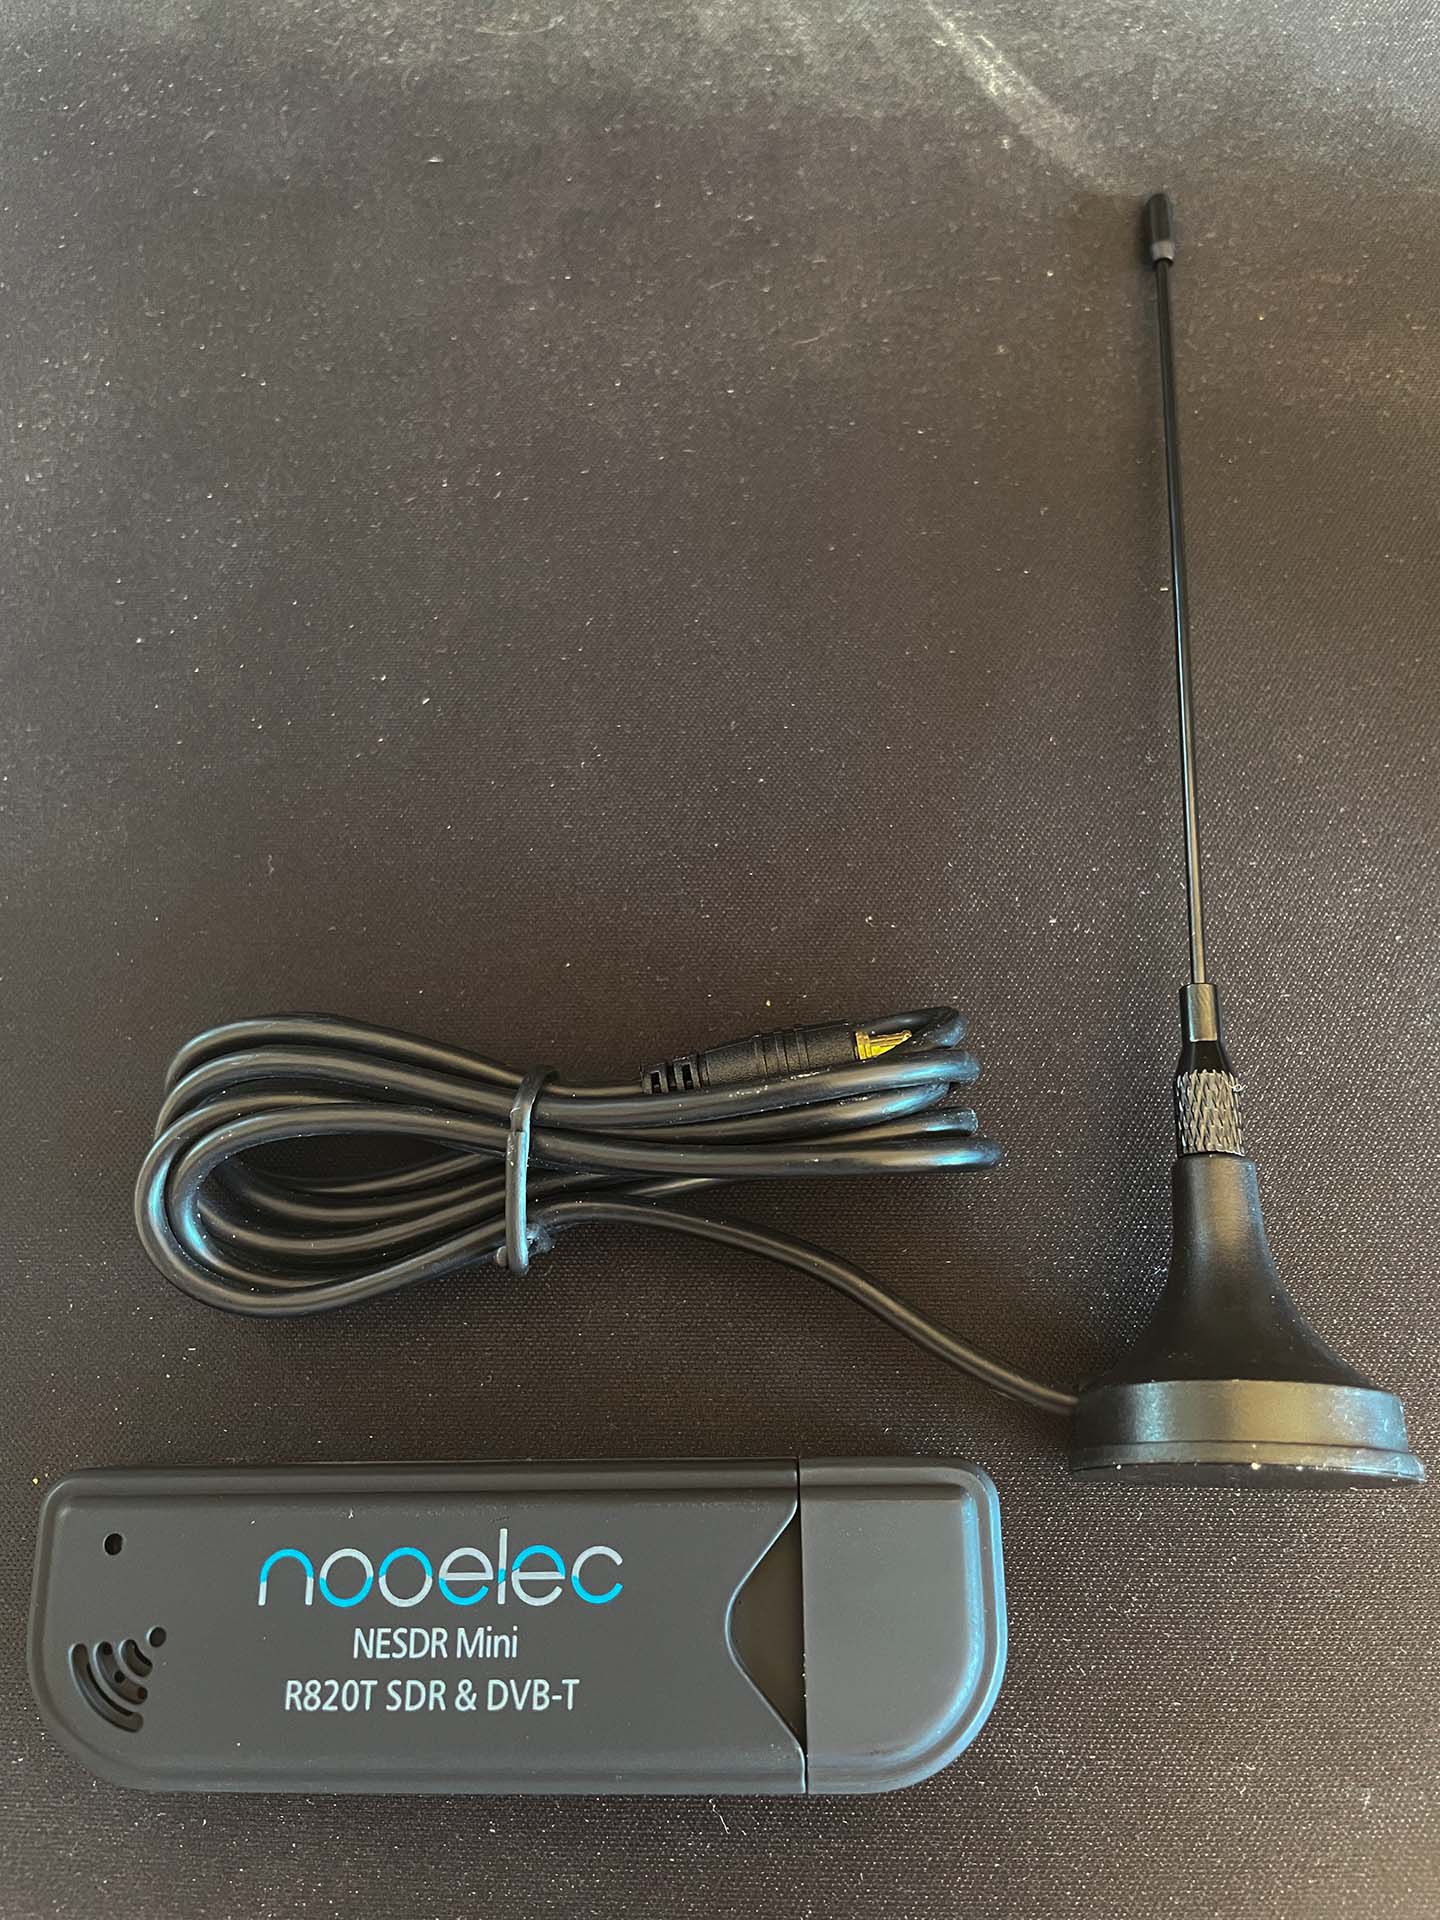
As my ADS-B receiver set, I use a TV28T-v2 USB dongle equipped with the RTL2832U chip. This dongle can be purchased on Amazon for around 25 euros.
2. The software
I personally use Ubuntu 20.04 LTS in the server version, and I strongly recommend using a Linux-based operating system - although with Docker and Docker Compose, the only other software required for this guide, the application should also work on Windows and other systems (and by the way also on ARM, but there is already a direct image from Flightradar24 for that).
Getting the API keys
A first step in this guide is preparing to obtain the API keys with which we can correctly assign our donated data. We need two different API keys here, since we want to forward our received data to two portals. First of all, user accounts should be created on Flightradar24 and FlightAware.
After that, use
sudo -s
docker pull mikenye/piaware:latest
timeout 60 docker run --rm -e LAT=YOURLATITUDE -e LONG=YOURLONGITUDE mikenye/piaware:latest | grep "my feeder ID"
to generate the API key for PiAware. Attention: In the last command, the future location of the receiver must be replaced with coordinates. After starting the last command, it should be displayed in the following syntax:
2020-03-06 06:16:11.860212500 [piaware] my feeder ID is acbf1f88-09a4-3a47-a4a0-10ae138d0c1g
The latter part is the key for PiAware (write this down!). So that the key can also be assigned to the correct user account, the receiver should be "claimed" on PiAware Claim.
For Flightradar24, we also still need the API key:
docker run
--rm
-it
-e FEEDER_LAT="YOUR_FEEDER_LAT"
-e FEEDER_LONG="YOUR_FEEDER_LONG"
-e FEEDER_ALT_FT="YOUR_FEEDER_ALT_FT"
-e FR24_EMAIL="[email protected]"
--entrypoint /scripts/signup.sh
mikenye/fr24feed
Here again, the coordinates must be replaced and this time also the email address of the user account at Flightradar24 as well as the height of the sensor above sea level in feet (!).
After a short time, the API key should be displayed as follows:
FR24_SHARING_KEY=XXXXXX-YYYYYYY
FR24_RADAR_ID=T-XXXX123
With the API keys of both platforms written down, we can finally move on to setup and installation.
Basic settings: setup
Equipped with the API keys, you should first check that Docker is running and up to date; we carry this out (and all further steps) with superuser privileges:
sudo -s
apt update && apt upgrade
Next, a new folder is created for the Compose script and the piaware cache (you may want to change the storage location; having docker compose folders in the home directory is not really ideal):
mkdir adsbreciver
In the next step, the USB dongle is plugged in; the antenna should already be connected to the USB dongle. After that, the kernel modules of the RTL receiver are disabled so that Docker can access the receiver without interference. With
/etc/modprobe.d/blacklist-rtl2832.confa new file is created, and the following is written into it:
# Blacklist RTL2832 so docker container piaware can use the device blacklist rtl2832
blacklist dvb_usb_rtl28xxu blacklist rtl2832_sdr
after restarting the computer, the actual software configuration can now begin. First, we go into the adsbreciver folder we already created:
sudo -s
cd adsbreciver
Then we create a Docker Compose file:
nano docker-compose.yml
The following content is inserted into it:
In the file itself, as already when generating the API keys, the correct location must be entered; the coordinates of the installation site replace the placeholder coordinates under LAT= and LONG= in lines 18 and 19 of the file. Then, in lines 20 and 35, the API keys are entered, after which the file can be saved and closed (ctrl + x, then confirm with "y").
Once all these points are done, it gets exciting - with
docker-compose up -d
the Docker container can be built and started; if everything works, no major error messages should appear now.
Whether the containers are actually running can then be checked with
docker ps
- the containers "piaware" and "fr24feed" should now be listed there.
Functional check and checking in the transmitting station
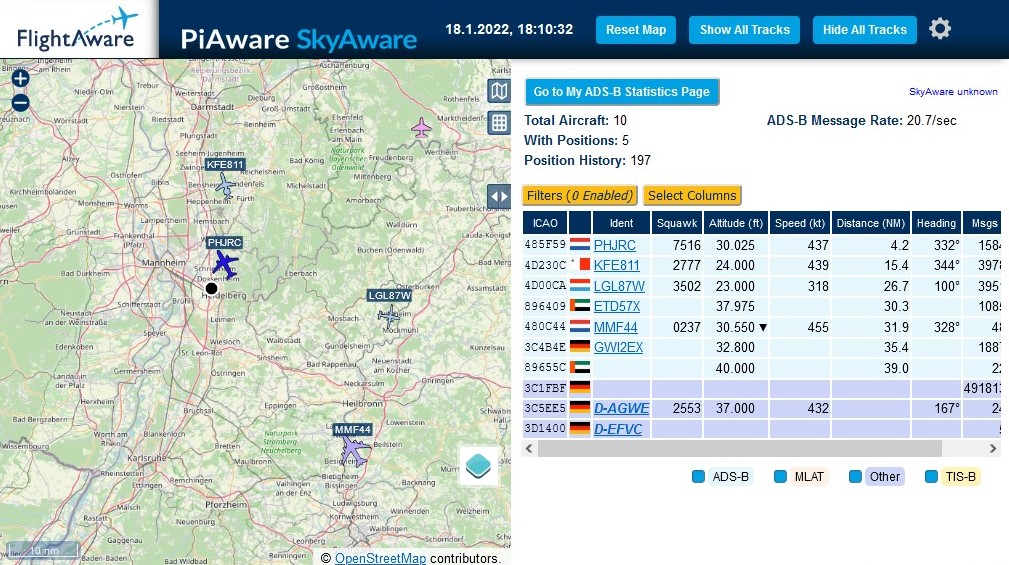
Congratulations, if everything was correct and the containers are running properly, can access the dongle, and the API keys are correct, the status pages of the receiver software can now be opened in the browser. To see them, add one of two ports after the IP of the server on which the software stack is running. With port :8080 you get to the PiAware status page, with port :8754 you see the Flightradar status page.

If everything really worked, emails from Flightradar24 and FlightAware should also arrive quickly saying that the transmitting station has successfully checked in and is sending data - this usually also directly unlocks the Business/Enterprise account on the platforms as a thank-you. From then on, it is only a matter of operating the transmitter permanently.
After a few days, it is definitely also worth taking a look at the statistics pages of Flightradar and FlightAware, which break down points such as alignment, transmitted aircraft, and availability. To do this, simply open the "My Statistics" section on each site via the user account.
By the way, the page of my receiver can be viewed here :-).
Notes for longer-term operation
A few more notes if you want to operate the software permanently:
- Take a look at the firewall configurations: the status pages should definitely not be reachable from the outside, so the ports of the receiver software should not be open. On standard consumer routers, this behavior is standard, but if in doubt, it is better to check the configuration again. If you do not have access to the local network for longer periods of time (e.g. during an extended bike tour through Scandinavia), you can also access the status pages without externally open ports with the help of VPN access (Fritzbox routers have this function built in).
- If the containers ever need to be restarted manually or the receiver software needs an update, the container can be taken offline with docker-compose down. No data is lost in the process.
Troubleshooting tips
Not everything works on the first try. I always recommend a reboot first before diving into log files.
If that did not solve the problem, the second step for me is always to query the current status of the containers with
docker ps
. In the next step, I usually call up the logs of the containers. This is easily possible with
docker logs [container]
where container is replaced with "piaware" and "fr24feed". As a rule, these logs already provide very specific clues about the error, e.g. that the API keys are wrong or the container cannot access the ADS-B dongle.
The latter error case has the special feature that the operating system may also have loaded drivers for the dongle, which means Docker cannot access the dongle. This error is shown with
2019-04-29 21:14:31.642500500  [dump1090-fa] Kernel driver is active, or device is claimed by second instance of librtlsdr.
2019-04-29 21:14:31.642635500  [dump1090-fa] In the first case, please either detach or blacklist the kernel module
2019-04-29 21:14:31.642663500  [dump1090-fa] (dvb_usb_rtl28xxu), or enable automatic detaching at compile time.
2019-04-29 21:14:31.642677500  [dump1090-fa]
2019-04-29 21:14:31.642690500  [dump1090-fa] usb_claim_interface error -6
in the log - in this case, the driver can be temporarily disabled with the commands
sudo rmmod rtl2832_sdr sudo rmmod dvb_usb_rtl28xxu sudo rmmod rtl2832
. After a reboot, however, it is very likely that the drivers will be loaded again; therefore, check the file under /etc/modprobe.d/blacklist-rtl2832.conf again to make sure the drivers are properly blacklisted.
Other common problems include UFW (Uncomplicated Firewall) taking effect, if a distribution with a preinstalled firewall was chosen - here, the status (and possible port blocking) of the firewall can be checked with
ufw status
.
If everything looks good in the logs but the page still cannot be accessed externally, a small test in the console (or directly in the browser on an operating system with a GUI) can significantly reduce the number of possible sources of error: simply open localhost:8080 and localhost:8754 - if no page loads, the problem lies in the area of the containers; if the page loads, something is wrong with the external access.